How to Create Document Templates and Initiate E-Signing
With e-signing in Simployer One, you can create secure signing processes using your own document templates or choose from a wide range of ready-made templates provided by Simployer.
Our e-signing solution offers a smooth experience, allowing documents to be signed electronically using a Simployer One account or BankID (Sweden only). Once signed, documents are automatically uploaded and stored in Simployer One.
Overview
Simployer One lets you create and send documents for electronic signing — employment contracts, policy confirmations, job description updates, and more. Documents are built from reusable templates with variables that auto-fill from employee or candidate data, so you only enter information once.
This article covers everything an administrator or HR user needs to set up and manage e-signing, including:
- Creating document templates with variables
- Sending documents for signing to employees
- Sending documents for signing to candidates — with built-in data collection so candidate details flow into the contract and later into the employee profile
- Adding a reviewer to approve documents before they reach signers
- Configuring multi-step signing order so signers sign in a specific sequence
- Managing active signing processes
Candidate data collection You can start a signing process directly from the Candidates table. If the document requires information that hasn't been provided yet (such as SSN, home address, or bank details), Simployer One can collect it from the candidate before the signing begins. When the candidate is later moved to New Hires, all collected data carries over to their employee profile — no re-entry needed.
Reviewer & Signing Order You can add a reviewer who must approve the document before it is sent for signing. You can also configure a multi-step signing order where each step must complete before the next step's signers are notified — for example, ensuring a manager signs before the new hire.
Permissions
By default, only Owners and Admins can create and manage signing processes.
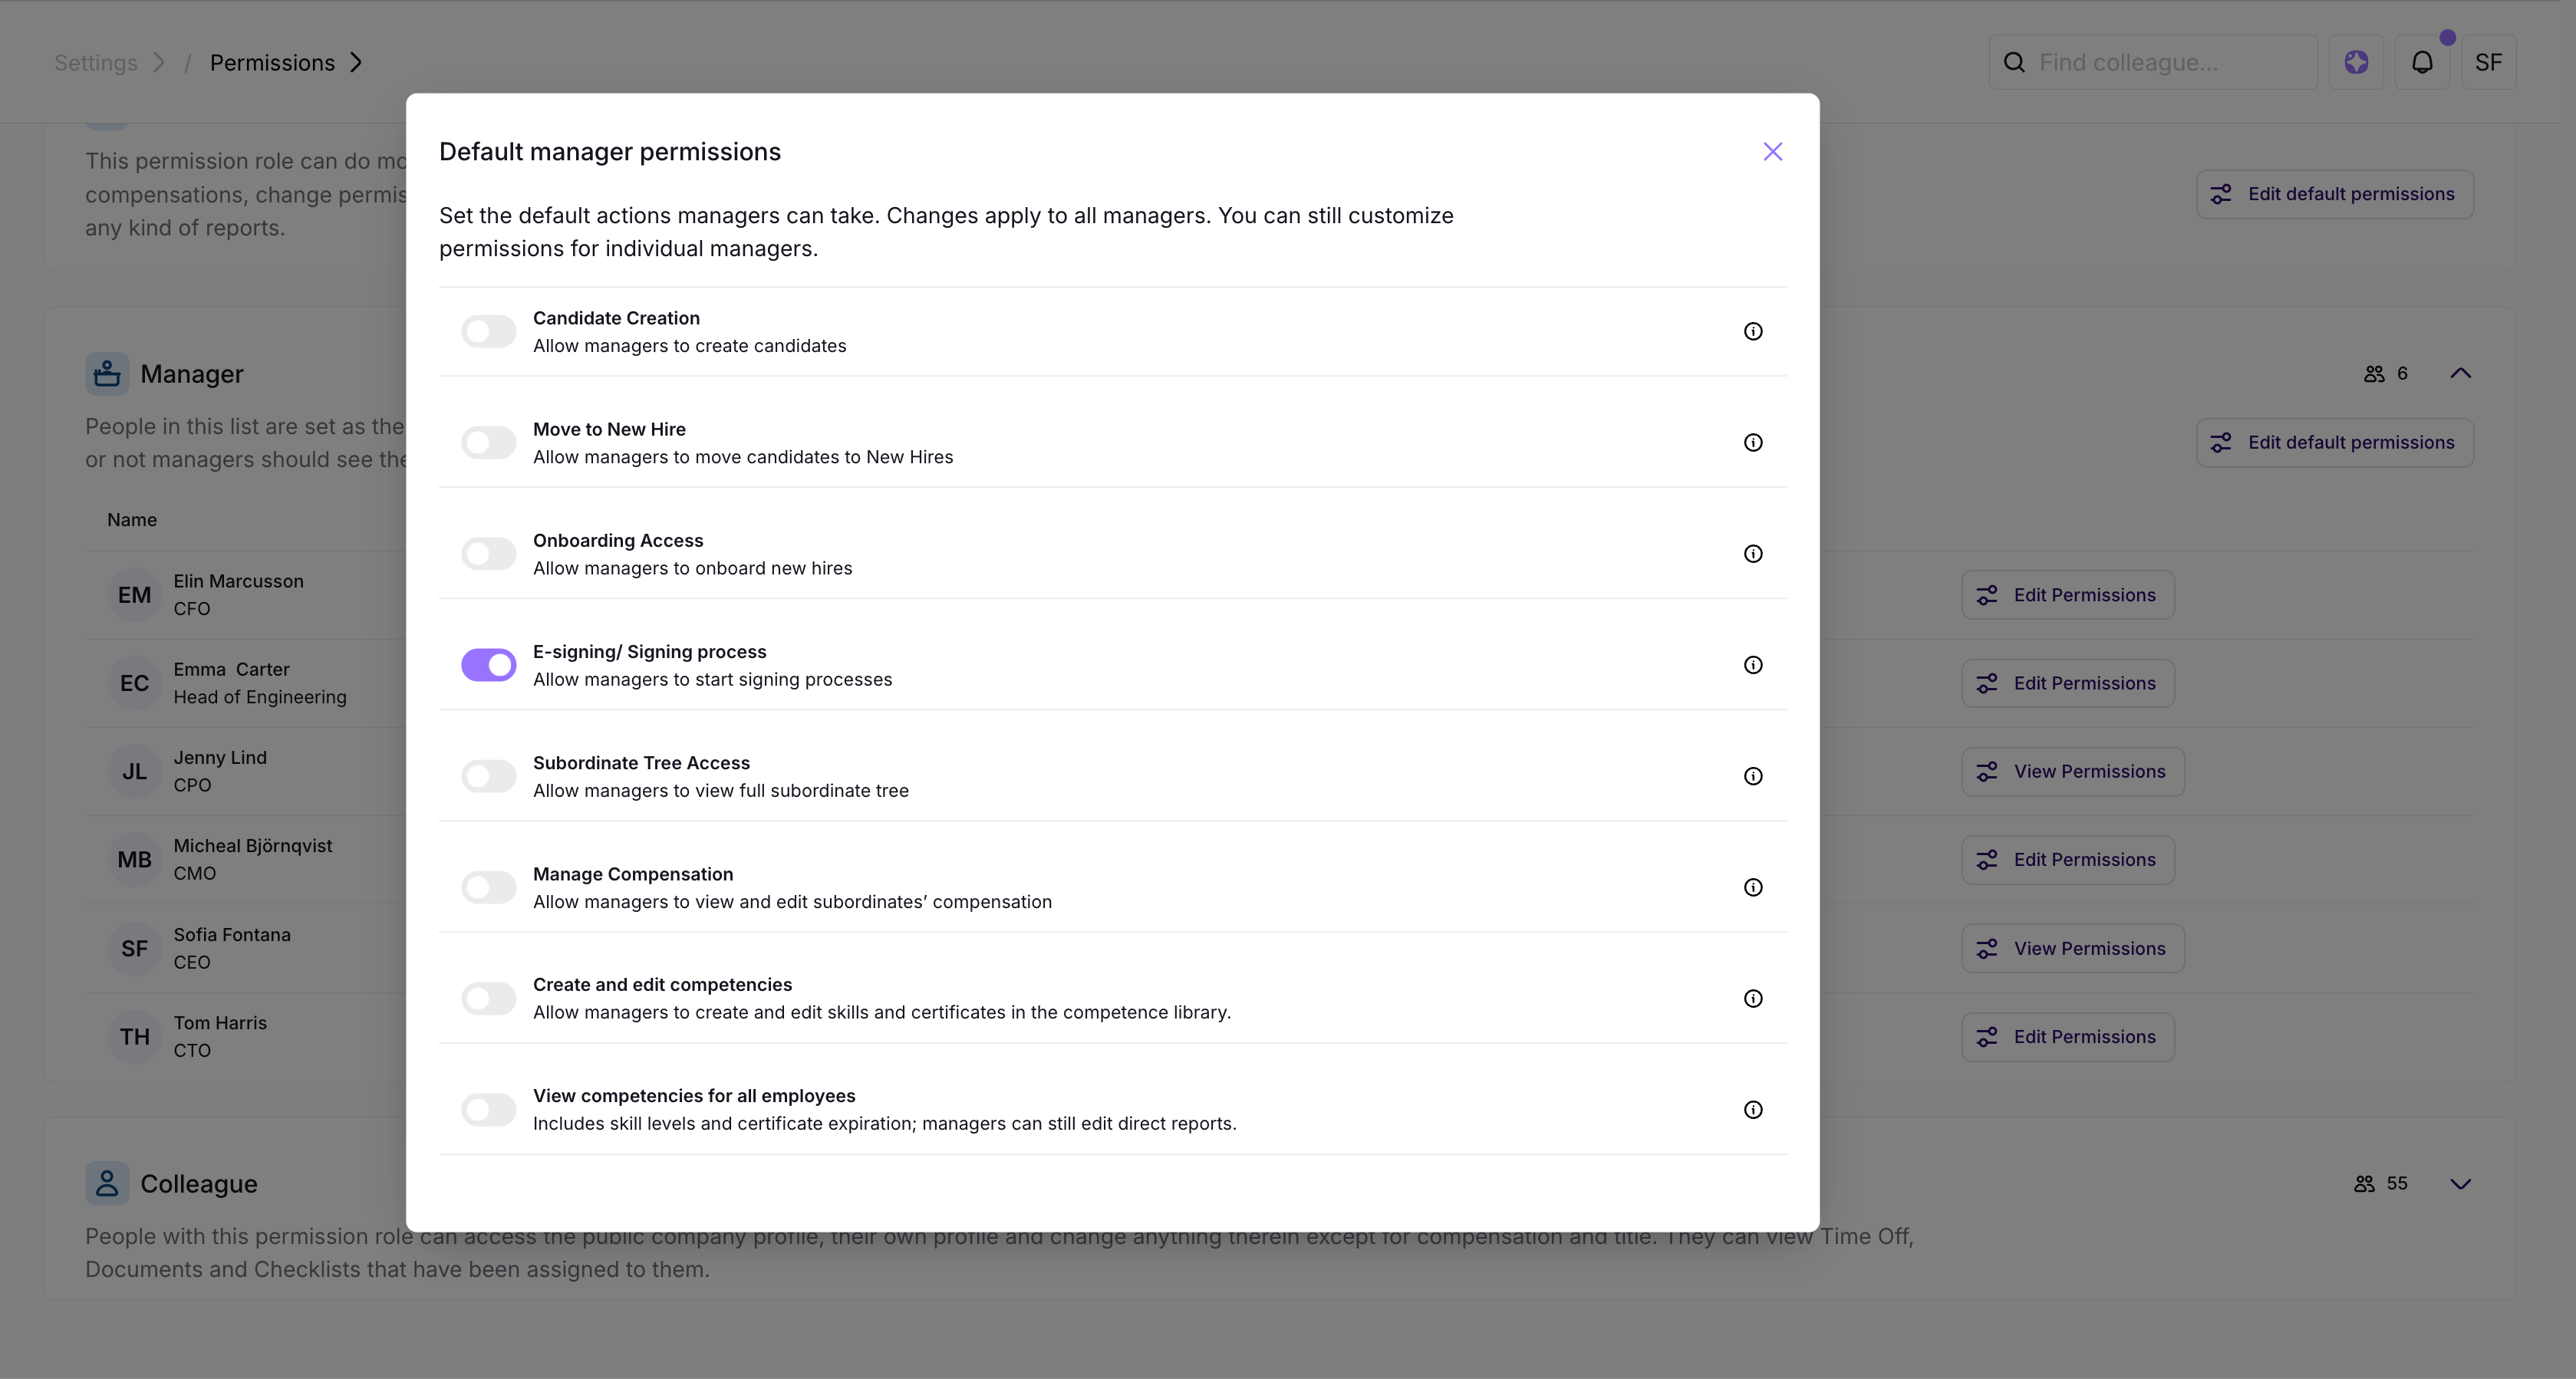
Managers can be granted permission to start signing processes using existing templates. To enable this, go to Settings > Permissions > Manager and turn on the Signing process permission.
To work with candidates, the Manage candidates permission must also be enabled for the relevant role.
Signing Process Roles
Every signing process has up to five roles:
| Role | Description |
|---|---|
| Target Employee | The person whose data fills the document variables. One per process. For candidate signing, this is the candidate. |
| Reviewer | Optional. Reviews and approves the document before it is sent to signers. Can approve or reject with a comment. A person can be both reviewer and signer. |
| Signing Parties | The people who must sign the document (at least one required). Once all have signed, the document is sealed. |
| Observers | Optional. Can track progress and receive a read-only copy of the signed PDF. |
| Process Creator | The person who sets up the process. Can revoke or edit it and owns the signed PDF. |
Note: Only Signing Parties, Observers, and the Signing Process Creator can access the signed document. If an employee needs access, they must be assigned one of these roles.
Creating Document Templates
- Go to Documents > Document templates.
- Click + New template.
- Name your template and add content.
- Use + Insert variable to add placeholders that auto-fill with employee or candidate data (e.g., First name, SSN, Department, Salary).
- Preview the template to check variable placement, then save.
Editing a saved template only affects new signing processes — documents already sent are not changed.
Tip: When building templates for candidate contracts, you can use variables from across the full candidate field set: personal details, employment terms, compensation, home address, and bank account. See the Candidate Fields section below for the complete list.
Sending a Document for Signing to an Employee
This is the standard signing flow for existing employees.
- Go to Documents > Signing processes.
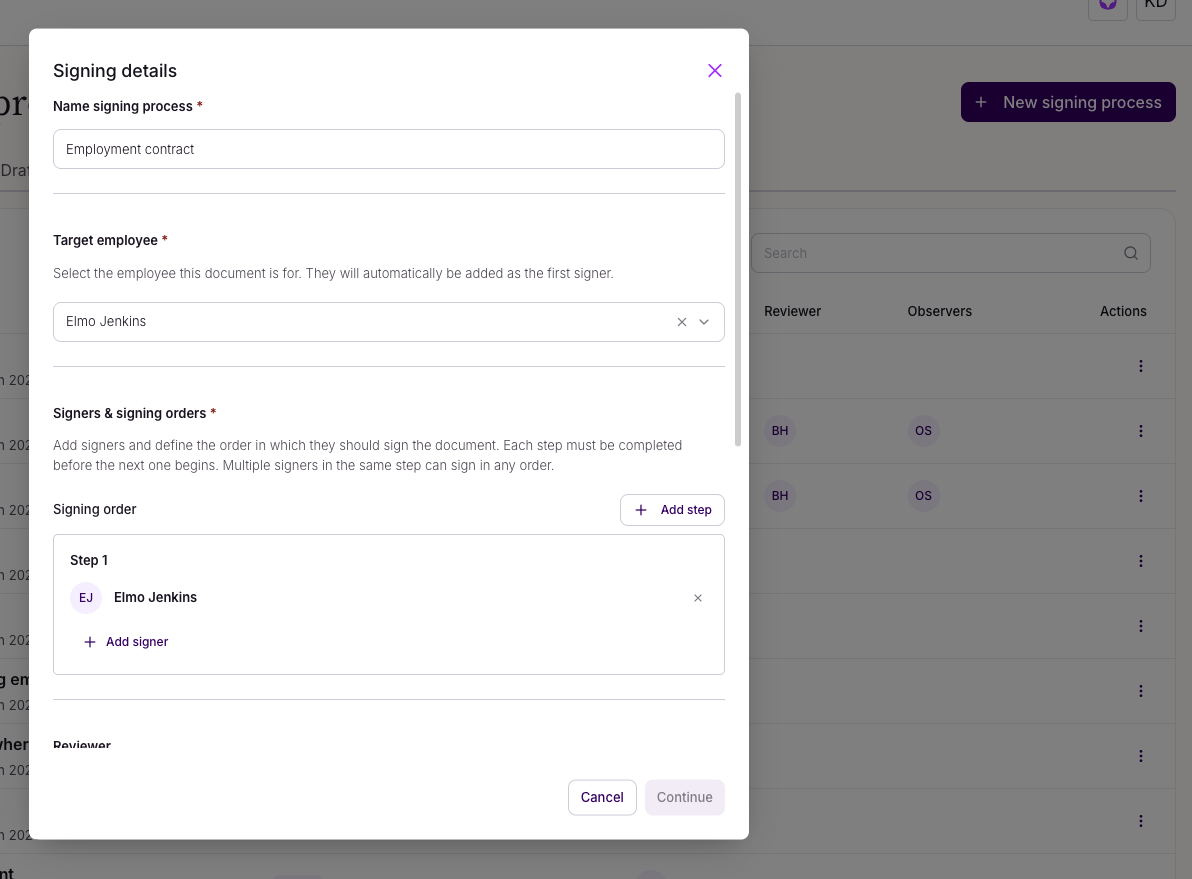
- Click + New signing process.
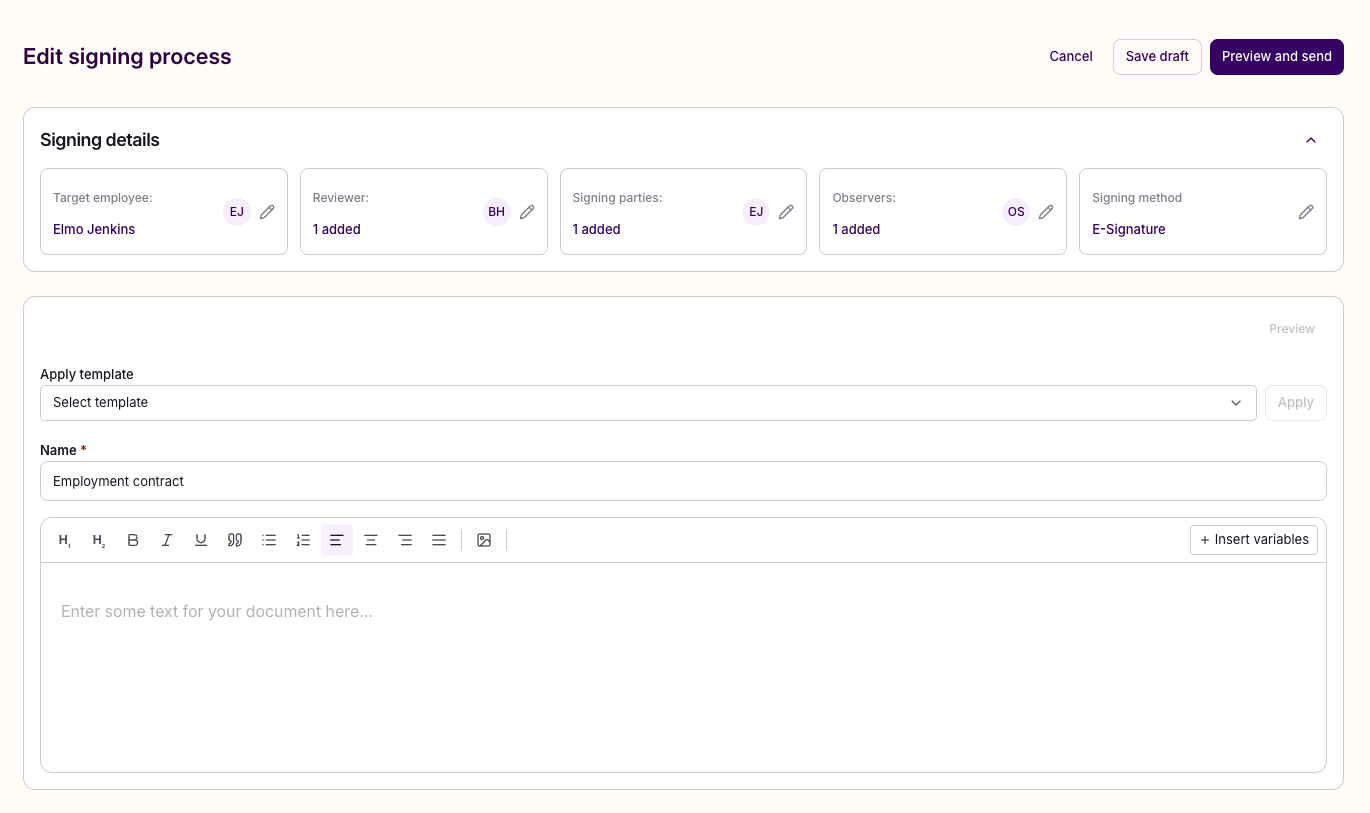
- Name the process and select (or create) a document template.
- Select a Target Employee — their data will fill the template variables.
- Add Signing Parties (at least one) and optionally Observers.
- Optionally add a Reviewer who must approve the document before it reaches signers.
- Optionally configure a Signing order by adding multiple steps. Signers within the same step sign in parallel, but the next step only opens once the current step is fully complete. You can reorder steps by dragging them.
- Preview the document to verify the variable values are correct. You can toggle variable highlighting to see each resolved value labelled with its variable name (e.g., "Hannah (First name)", "SEK 35 000 (Salary)").
- Click Send to start the signing process, or Save as draft to finish later.
If a reviewer has been added, the document is sent to the reviewer first. Signing parties are notified only after the reviewer approves. If no reviewer is set, signing parties are notified immediately.
When a signing order is configured, only the signers in Step 1 are notified to sign. Once all signers in a step have signed, the next step's signers are notified automatically.
Sending a Document for Signing to a Candidate
Use this flow when you need to send a contract (or other document) to a candidate who is not yet an employee in Simployer One. The system collects any missing information from the candidate before the signing begins.
Step 1: Add a candidate
- Go to People > Employees > Candidates.
- Click Add candidate.
- Enter the candidate's name and email address (required for e-signing). You can also add job title, phone number, and start date.
- Click Add.
Step 2: Start a signing process
From the Candidates table, click the Start signing process button on the candidate's row.
If the candidate already has a draft signing process, the button will say Continue signing process. If a signing process has already been sent, click View documents to see all processes linked to this candidate.
Step 3: Select and configure the document
- Choose an existing document template or create a new one.
- Edit the document content if needed.
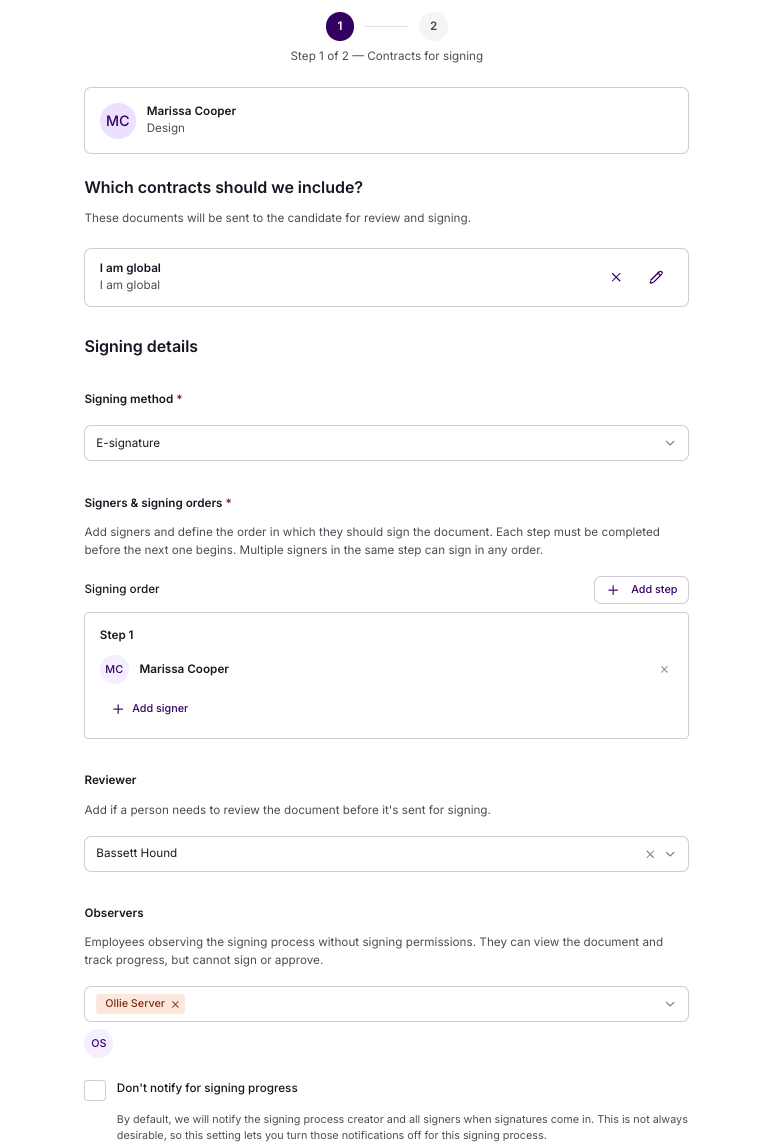
- Configure the signing details:
- Add Signing Parties (at least one signer is required).
- Add Observers (optional).
- Add a Reviewer if you want someone to approve the document before it is sent for signing.
- Configure a Signing order if signers need to sign in a specific sequence.
- Choose whether the signing process should start automatically after the candidate submits their data, or whether you want to review the submitted data first before the signing begins.
- Click Next to proceed to field detection, or Save as draft to continue later.
Step 4: Review detected fields and fill in employer data
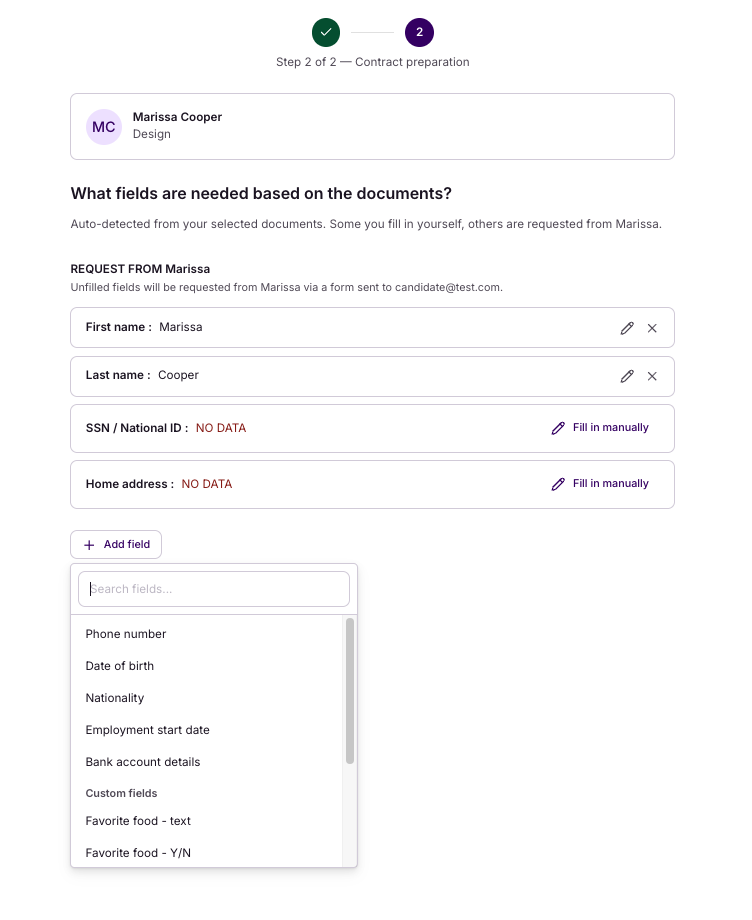
Simployer One scans the document template and identifies which data fields are needed. These fields fall into two categories:
- Employer fields (e.g., Department, Title, Salary, Employment type) — you fill these in directly. The candidate cannot edit them.
- Candidate fields (e.g., SSN, Home address, Bank account) — these will either be pre-filled from the candidate record, or collected from the candidate.
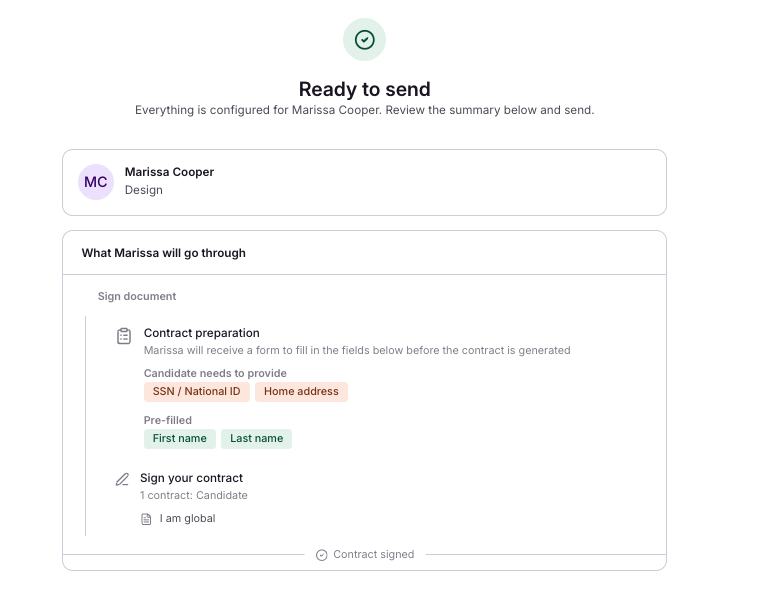
Before sending, you'll see a summary of "What [candidate name] will go through", showing which fields the candidate still needs to provide and which are already pre-filled:
- Candidate needs to provide (red) — fields the candidate must fill in before the contract is generated.
- Pre-filled (green) — fields that already have data from the candidate record or entered by you.
Fill in any required employer fields before proceeding — the Review & send button is disabled until all employer fields have values.
You can also click + Add field to request additional information from the candidate beyond what the document requires.
Step 5: Review and send
Click Review & send. What happens next depends on whether the candidate needs to provide any data:
- If candidate fields are missing: The candidate receives an email asking them to fill in their details. The signing process shows as Awaiting candidate info until they submit.
- If all fields are already filled: The signing process starts immediately and signers are notified.
What the candidate sees
The candidate does not need a Simployer One account. Here's what happens from their side:
- They receive an email with a link to provide their details.
- They enter a verification code sent to their email to confirm their identity.
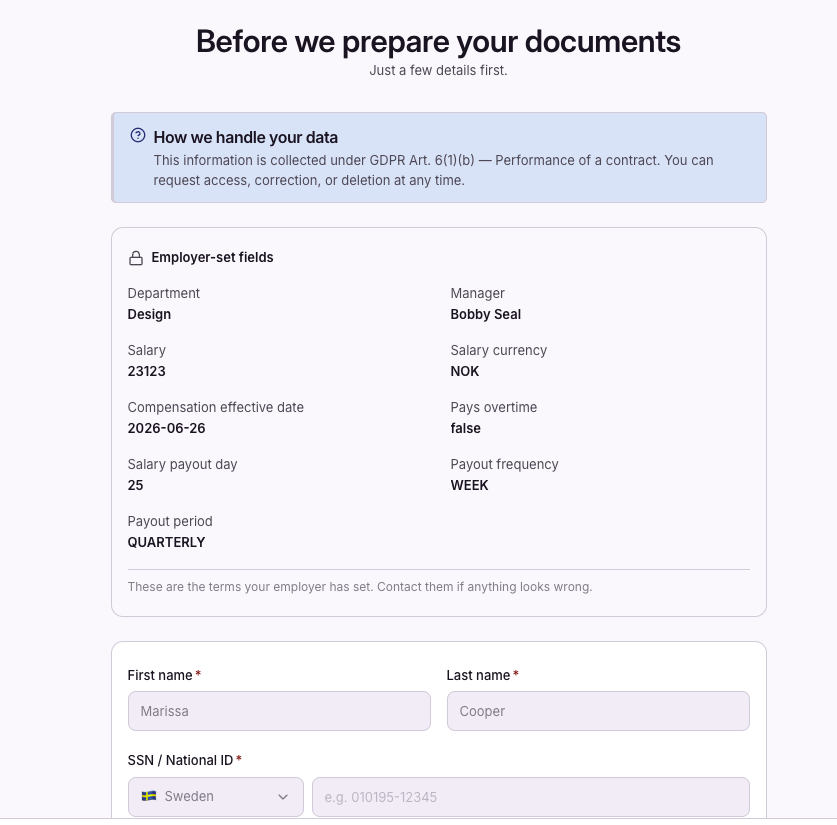
- They see a page with two sections:
- Your offer — read-only summary of the employer-provided details (e.g., salary, department, title).
- Your details — a form where they fill in their personal information (e.g., SSN, home address, bank details).
- A GDPR information notice is displayed explaining how their data will be used.
- They complete the form and click Submit.
After submission, the candidate's form is locked — they cannot re-submit unless you request a correction. The signing process then either starts automatically (sending the document to all signers) or moves to your review queue, depending on the option you chose in Step 3.
Moving a Candidate to New Hires
Once the signing process is complete and the document is sealed, you can convert the candidate into an employee:
- Go to People > Employees > Candidates.
- Click the three-dot menu (or Action menu) on the candidate's row.
- Select Move to new hires.
This creates a new employee profile populated with all the data collected during the signing process — personal details, employment terms, address, bank account, and more. All signed contracts are automatically archived on the new employee's profile.
Note: Moving to new hires is a manual action — Simployer One does not automatically convert candidates to employees after signing is complete.
Managing Active Signing Processes
Viewing signing processes for a candidate
Click View documents on a candidate's row to see all linked signing processes. For each process you'll see the status, signers, and available actions:
| Status | Meaning | Available actions |
|---|---|---|
| Draft | Not yet sent. Also shown after a process has been revoked — the row resets so you can start fresh. | Edit, Duplicate, Delete |
| Awaiting candidate info | Document has been sent, but the candidate hasn't submitted their data yet. You can still edit the process while waiting. | Download, Edit, Duplicate, Revoke |
| Awaiting correction | You have requested a correction — waiting for the candidate to resubmit their details. | Download, Edit, Duplicate, Revoke |
| In review | The document is waiting for the reviewer to approve or reject it. | Download, Duplicate, Revoke |
| In Progress | Candidate data is complete and the document has been sent to signers for signature. | Download, Duplicate, Revoke |
| Rejected | The reviewer has rejected the document. The process returns to draft with the reviewer's feedback visible. | Download, Edit, Duplicate, Delete |
| Signed | All parties have signed. The document is sealed and available as a PDF. | Download, Duplicate |
Note: Once the candidate submits their details, the status changes from "Awaiting candidate info" to "In Progress" and the process can no longer be edited.
Revoking a signing process
If something needs to change after a signing process has been sent, click the three-dot menu on the process and select Revoke signing. You will see two options:
- Just revoke — cancels the signing process. The process is revoked and removed.
- Resend with edits — revokes the current process and creates a new draft with the same document and settings, so you can make changes (e.g., correct candidate data or update the document) before re-sending. The candidate receives a new email asking them to update their details. The status changes to Awaiting correction until they resubmit.
Note: "Resend with edits" is only available before any party has signed. If someone has already signed, you can only choose "Just revoke" and start a new signing process manually.
All parties are notified when a process is revoked.
Duplicating a signing process
As an Owner, you can duplicate any signing process to reuse its template and configuration. Click the three-dot menu on any process and select Duplicate. This opens the signing wizard with the same document and settings, named "Copy of [original name]".
Viewing recent activity on a signing process
On the Documents > Signing processes page, hover over a status badge to see a summary of recent activity — who signed, approved, rejected, or revoked, and when. The list is sorted by last modified date so the most recently updated processes appear first.
Editing a draft
Drafts can be resumed at any time. From the Candidates table, click Continue signing process, or find the draft under Documents > Signing processes and click Edit.
Notifications
The following email notifications are sent automatically:
Action-required notifications (always sent):
| Event | Recipients |
|---|---|
| Data collection request sent | Candidate |
| Document ready for review | Reviewer |
| Document resubmitted for review | Reviewer |
| Document rejected by reviewer | Process creator (includes reviewer's comment) |
| Ready to sign | Signing parties in the current step |
Lifecycle notifications (always sent):
| Event | Recipients |
|---|---|
| Signing process started | Step 1 signers (with sign link), later-step signers (notified they will be contacted when it's their turn), observers |
| Reviewer approved | Process creator |
| All parties have signed (document sealed) | All participants |
| Signing process revoked | All participants (except process creator) |
Progress notifications (can be turned off):
| Event | Recipients |
|---|---|
| A party has signed | Other signing parties, process creator |
To disable progress notifications, check "Don't notify for signing progress" when setting up the process. This only affects per-signature updates — action-required and lifecycle notifications are always sent.
Candidate Fields Reference
The following fields can be used as template variables and collected during the candidate signing flow:
Candidate fills in (candidate-owned)
| Category | Fields |
|---|---|
| Personal | First name, Last name, Private phone, SSN (+ SSN country), Birthdate, Nationality |
| Home address | Address, Zip code, City, Country |
| Bank account | Bank country, Clearing number, Bank name, Account number, IBAN, BIC/SWIFT |
HR fills in (employer-owned)
| Category | Fields |
|---|---|
| Work | Department, Division, Employee number, Manager, Office, Organization, Title |
| Employment | Country, Employment type, Start date, End date, Public holiday calendar |
| Compensation | Rate, Salary, Currency, Payout period, Effective date |
Related Articles
Was this article helpful?
That’s Great!
Thank you for your feedback
Sorry! We couldn't be helpful
Thank you for your feedback
Feedback sent
We appreciate your effort and will try to fix the article